


Handgun Retention Shooting Positions
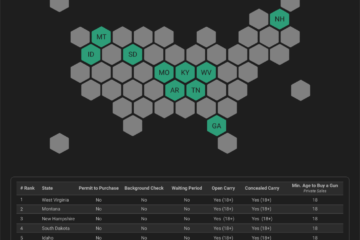
According to the FBI’s Uniform Code Reports, statistics demonstrate that the largest percentage of defensive handgun shootings occur between three and five yards. It is the same distance in a gunfight, that within one or two steps and in less than a second, you could find yourself in a hand-to-hand struggle for control of your own gun.
A gunfight is a dynamic combat environment. Aside from creating distance, which keeps a healthy amount of space between your handgun and an active threat intent on causing you harm, there is an entire art and science dedicated to retaining your firearm in such an environment which most shooting schools refer to as “Handgun Retention.” The focus of our study here are the three most effective, and recommended, firing positions in handgun retention.
The Need For Retention Shooting
- Buy All-American!
- Bring health and vitality back to your body with these non-transdermal patches
- Get your Vitamin B17 & Get 10% Off With Promo Code TIM
- How To Protect Yourself From 5G, EMF & RF Radiation - Use promo code TIM to save $$$
- The Very Best All-American Made Supplements On The Market
- Grab This Bucket Of Heirloom Seeds & Save with Promo Code TIM
- Here’s A Way You Can Stockpile Food For The Future
- Stockpile Your Ammo & Save $15 On Your First Order
- Preparing Also Means Detoxifying – Here’s One Simple Way To Detoxify
- The Very Best Chlorine Dioxide
- All-American, US Prime, High Choice Grass-Fed Beef with NO mRNA, hormones or antibiotics... ever!
What is the need for retention firing positions? In a dynamic extremely violent physical engagement, an attacker can be upon you with little or no warning. You could be caught flatfooted with few, if any, mobility options. In fact, you’d be lucky to even get your gun out of the holster and with the muzzle pointed in the right direction.
You may also observe, sense, or otherwise get the idea that he or they (multiple attackers) may be reaching for or trying to take your gun away from you.
In terms of controlling your immediate battle space, you are contending with a reactionary gap where, already caught behind the action-reaction power curve, you are trying to catch up and move to the front of that curve.
The bad guys always have the initiative as they start the fight, and you are trying to take back that initiative with always not enough time. In such extreme close quarters, it’s too close (distance) to your opponent(s) where your legs are not an option to run away. You may even need to use your hands to deflect or redirect an incoming knife or block a strike to your melon with a baseball bat.
If you can create enough space which buys you time and opportunity to solve the tactical problem, then at best you may have bought yourself an extremely limited amount of time and/or conditions to deploy your lifesaving tool from its holstered position.
Strong Hand Only
At extreme close quarters you absolutely do not have the space, time or conditions to go to fully extended position using both hands. The very best you can do is to at least clear the holster and get the muzzle pointed toward the oncoming threat. Consider yourself quite fortunate if you can even get this far in a fight for your life.
The mechanics of the draw stroke do not change except that you will not have the time or opportunity to move too far from the holster. It is recommended to keep your support hand in close to your body, but you won’t have the time to support your firing hand with it as there’s simply not enough time.
Your strong hand wrist should be up high against your holster-side rib cage with your strong elbow pointing straight back and your wrist more toward the ‘palm up position’ forming a 45-degree angle away from your body. The reason for this canted position is so that you will not impede the cycling of the slide when firing.
It is strongly recommended that if you’ve never fired from this position to get to the range and work through it safely. Start slowly at first and then build your speed up to a comfortable pace. What your training for is safe and rapid deployment that you can deliver accurate and affective combat round placement from the strong hand only retention position.
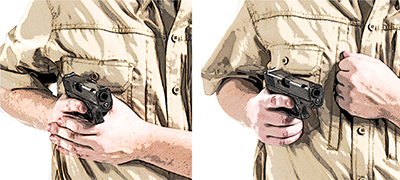
Strong Hand Supported
When it comes to firing platform stability, which of the two is better – strong hand only shooting or two-handed (supported) retention firing grip?
Yes, you guessed it – two hands are always better than one which support better grip, more stability and control in round placement. However, remember that you are under pressure and although an improvement over the strong hand only firing position, as you now have two hands on the gun, you are still fighting for your life and do not have much time.
Like the previous firing position your strong hand wrist should be up high against your holster-side rib cage now just a little more forward making space for the connection of your support hand.
Now with two hands on the gun, keep your elbow pointing straight back and your wrist straighter and up high close to your upper torso and a bit less canted than the previous firing position because the gun is just a little bit further away from your body. Given two hands in the retention firing position you are afforded a more stable firing platform and better retention.
Extended Position
The third and final handgun retention firing position is with both hands on the gun and with both arms extended. The difference is though that you are mentally ready and able to retract to either of the first two retention positions or use your legs to create a change in physical position or a change in distance from immediate physical reach contact range (a distance where your opponent(s) may still reach your gun) to non-contact range (clearly out of physical reach).
Again, if you’ve not shot from these three retention firing positions it’s a good idea to get to the range and work all three – each one at a time and then a drill where you transition from one to the other at different distances between the most common yard lines where the largest percentage of gunfights occur.
Article by STEVE TARANI


