


Gun Skills: Shooting from Retreat
If I ask 10 students how they practice, nine will likely admit they’re glued to a narrow firing line shooting at a stationary target. I recognize that this is the most readily available method, and it’s great that they’re practicing at all, but it’s vital to recognize such practice doesn’t represent a defensive situation in the slightest. It’s important to “get off the X.” But even when we do, we often forget rearward motion as an option.
Stepping back opens the gap between us and any assailants, giving us time to get our gun out and to further test the attackers’ intention to do us harm. Additionally, if we must use a firearm, then any security footage showing us backing away should be appreciated fare by a jury. We also get the ultimate peace of mind in knowing that we attempted to retreat.
Safety First
To safely practice shooting from a retreat, you’ll need a specialized range. Typically, this will be a private club where you do not have to share a shooting bay. Typical static-target ranges won’t work for this, as taking even one step back would put other people in front of your muzzle. In essence, you’ll need a shooting area where you are alone, and thus the firing line is defined by where your feet are. On the other hand, as the emphasis is on our motions, there is plenty of value in conducting these routines right at home with an empty gun.
- Buy All-American!
- Bring health and vitality back to your body with these non-transdermal patches
- Get your Vitamin B17 & Get 10% Off With Promo Code TIM
- How To Protect Yourself From 5G, EMF & RF Radiation - Use promo code TIM to save $$$
- The Very Best All-American Made Supplements On The Market
- Grab This Bucket Of Heirloom Seeds & Save with Promo Code TIM
- Here’s A Way You Can Stockpile Food For The Future
- Stockpile Your Ammo & Save $15 On Your First Order
- Preparing Also Means Detoxifying – Here’s One Simple Way To Detoxify
- The Very Best Chlorine Dioxide
- All-American, US Prime, High Choice Grass-Fed Beef with NO mRNA, hormones or antibiotics... ever!
From Concealment
While using a shot timer, see how close you can get to having an engagement time under 1.5 seconds from a holster (inside or outside the waistband), concealed by an open-cover garment.
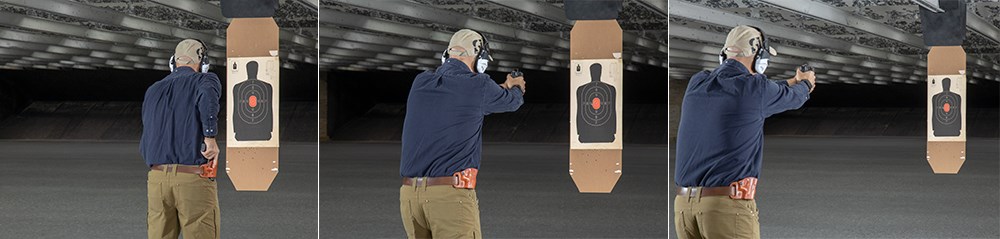
1. While standing 3 yards from a target, begin the timer and wait for the start signal.
2. At the tone, aggressively flip open your cover garment, draw and fire one shot while retreating. To retreat, keep most of your weight on your front foot as you reach back with your rear foot—this allows you to use that rear foot to feel for any obstacles behind you without tripping over them. If that rear foot meets only the ground as expected, put your weight on it, then repeat that sequence, bringing the other foot rearward to continue retreating.
3. Repeat five times and record your distance from the target, but only if you were able to fire a shot in under 1.75 seconds.
4. Repeat this maneuver five times, except now from a starting distance of 5 yards. The yardage increase will better test how well you remain indexed to the target.
5. Finish the routine by backing out to 7 yards and running the drill five more times.
From Open Carry
Open carry has its advantages, but let’s not forget the disadvantage of having our pistol out there for somebody, namely a second attacker, to grab. When practicing retreat with this carry method, assume the scenario of somebody grabbing your gun from behind. Here is a routine to work on this style of attack.
1. Again working with a shot timer, place a target at 3 yards.
2. Turn away from the target.
3. At the start signal, swat back (to discourage hands near your holster) as you rotate toward your weak side so that you are facing downrange.
4. Begin drawing as you move rearward.
5. Fire one shot within 2 seconds.
6. Repeat until the motion becomes fluid and you can place a round on the target in under 1.1 seconds.
From the Pocket
Pocket carry is a viable option when wearing a tucked-in shirt without anything over it. Often, this is my only method of carrying (aside from using an ankle holster, which does not offer a means of drawing on retreat, only drawing after retreat). This method is extraordinarily easy to wear, but tough to draw from rapidly. Part of the reason is that it’s hard to balance yourself walking backward when your hands can’t sway.
1. Practice this routine first with an unloaded gun to ensure that your hand placement is consistently correct and that you do not flag yourself with the muzzle.
2. Set up a target at 3 yards and prepare your shot timer.
3. At the beep, begin stepping rearward (with your weight mainly on the forward foot as before). During your first step, raise your support hand to chest level and get your dominant hand close to your pocket.
4. Quickly reach into your pocket, strip your pistol from its holster, join your support hand to it and extend your gun as you begin to take your second rearward step.
Practice until you have a draw time under 2 seconds.
The Breakdown
Practicing these techniques gives you two metrics to mark your improvement: distance gained and draw speed. Striking a balance between all considerations will mean something different to every carry style, but it’s imperative to put in the work. Furthermore, taking two steps back might be all you need to scare off an attacker, as it is typically a large-enough motion to garner attention from observers; you may also want to practice verbalizing commands and requests for aid. Additionally, this short distance may be all you need to get back into your car or safely behind cover. Above all, space means time, and time means options.
Article by FRANK MELLONI


